Customized interview documents can be generated from an Oracle Web Determinations application. Typical documents include an assessment notice and a personalized claim form.
By default, the first screens file that is added to a project will contain a Documents folder. To add additional folders to your screens file:
Right-click the *.xint filename, or another folder, in the screens view.
Select New Folder from the pop-up menu.
Enter an appropriate name for your screen folder.
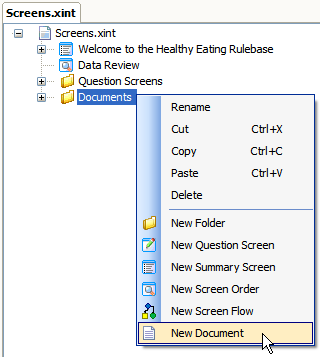
Create a new interview document
To create an interview document:
Right-click the Documents folder in your screens file and select New Document from the pop-up menu.
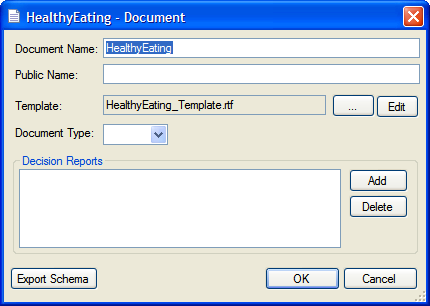
The Document editor will appear:
Enter an appropriate name for the document in the Document Name text box (by default this will be the name of the rulebase).
Optionally provide a Public Name for the document. NOTE: This public name must be unique across all screen files in the project.
Specify the Template file (.rtf) to be associated with the document. A default blank template is automatically created (<Project name>_Template.rtf) in the project under \include\templates\<locale>. TIP: Use the Edit button to open the template for editing in Microsoft Word. See Develop a template for an interview document for more information on editing templates.
Select the Document Type from the drop-down list. The options are: Excel, HTML, PDF or RTF.
Add any Decision Report attributes that you would like available to your interview document. (Click on the Add button and then select the attributes from the Attribute Selector. The only attributes available as decision report attributes are top level and intermediate level attributes with public names. Then click OK.) Adding entries into the Decision Reports list not only ensures that an attribute is present in the XML, but that a full decision report is also available for it. TIP: Take care not to add unnecessary entries here, as they may slow down the document generation process.
Click the Export Schema button. This button exports an XSD representation of the document definition. (NOTE: Only those attributes with public names are included in the generated XML schema. You therefore must have a Properties file in your project which contains your public names.) This is important as you will generally need to import this XSD file into the BI Publisher tool in Word in order to develop your document template. In the Save dialog box, enter a name for the XML schema file, then click Save. (NOTE: Schema files are document, not rulebase, specific so be sure to name your schema according to the document it relates to.)
Click OK.
Modify an interview document
To modify an existing interview document, double-click on the document name in your screens file, or right-click and select Open from the pop-up menu. Make the necessary changes in the Document editor and then click OK.
Delete an interview document
To delete an interview document, select the document name in your screens file and press Delete, or right-click and select Delete from the pop-up menu.